1

Your cart is empty.

12 Aug '16

Eyeliner: Where to begin?

Eyeliner 101

With so many different types of eyeliners on the market today, it's easy to get lost in all the confusion. Today I will try and help clear things up... beginning by discussing the different kinds of eyeliner, as well as application techniques.

Pencil Eyeliner

Pencil LIner ISA Professional

Pencil eyeliners are great for beginners. They're fairly inexpensive, come in a rainbow of colours and can be found at almost every drugstore, department store, and just about anywhere else you can think of. It's because of those factors that make the pencil is the most commonly used eyeliner around. They are extremely easy to use; simply sharpen the top and use it just like you would any other pencil. However due to its soft texture it doesn't allow for very defined lines. I would suggest using pencils for a more subtle natural look. It's easily smudged so be prepared to re-apply throughout the day.

Gel Eyeliner

Gel Liner ISA Professional

Gel eyeliners are a fairly new product for me so experimenting with it was fun to say the least! They come in a container that allows you to choose what style brush you want to use. So depending on which one you decide on, you can achieve many different looks. Gel goes on smoothly and stays on for hours without smudging, which is great for long days. I really like the matte finish look that gel provides. The downside? The colour selection is not as abundant as liquid or pencil.

Pro-Tip: Gel liner can dry out quickly, so make sure that you replace the lid as soon as you are done using it.

Liquid Liner

Liquid Liner ISA Professional

Liquid liner is a bit more tricky to master and requires some patience. When looking at tip styles I found two main types, the brush and the marker/pen. The brush tip is the most desired method (for most) of application. I personally don't like this style tip because I don't have a steady hand, and you definitely need one for it. The marker/pen is my personal favourite because I found it easier to work with. Please be mindful that most of these are made with felt or sponge and if you press to hard it tends to "bleed" out more liner than needed. (Think of squeezing a sponge...same idea!) Another thing to consider is that if your brush bristles become bent in any direction, you will not be able to achieve crisp and clean lines. Liquid will last much longer than gel does and also comes in a wide variety of colours.

Pro-Tip: If you make a mistake, simply dip a cotton swab in some makeup remover and use it to wipe it away.

Application Techniques

Applying Eye Liner ISA Professional

Now we can talk a bit about application techniques. As I mentioned before, pencils are extremely easy to use so I wont go into too much detail there. The most important thing when it comes to applying pencil is to keep the skin tight. This will help make sure you achieve a straight lines. Beginning with the upper lash line, start at the inside corner and work your way outwards. Do the same for the bottom lash line. For a more dramatic look line both the bottom and top lash lines all the way across. For a more natural look only line the top three quarters the way across the bottom or opt for a lighter shade.

With gel liners the possibilities are endless! After trying out many different brush styles, I found that a small angled one worked the best for me.

For an all-in-one solution use a small fine tip. It will give you the option of creating a thin line or adding more for a thicker one.

Using the tip of your brush, apply the gel to your inner lash line and lightly sweep it outwards. You may need to go over this line a few times to get it just right. Keep some makeup remover close by so you can erase any mistakes immediately. When applying to the lower lash line make sure to put it under the waterline only. Play around with it and have fun...but don't forget to ensure your eye health by frequently cleaning all your brushes.

Makeup Brushes

Liquid eyeliner is the most dramatic but also tends to be the most difficult to apply. Be patient and don't be to hard on yourself if it takes some time to get used to. The first thing to remember when using liquid is to shake your bottle well. Just like when applying the gel, begin on the inner lash line and work your way outwards. When first starting out, I prefer make dots and then slowly and carefully connect them together.

For a cat-eye look without the stress...try placing a piece of gift wrapping tape just by the eye. The angle placement of the tape will essentially determine the overall look you are trying to achieve. I like to use a pencil first to outline the eye and then draw the liquid over top. It also takes a bit longer to dry so make sure you give it enough time to set. I promise you, it's well worth the wait!

Now all that's left is to decide on a colour and I'll leave that up to you!

08 Aug '16

How to Choose The Best Shampoo And Wash Your Hair Healthy

Choosing The Right Shampoo for Healthier Hair

Woman Choosing Her Shampoo and Conditioner- ISA Professional

While it may seem like a simple topic to talk about, there are many that do not consider the ingredients or consistency when choosing their shampoo or conditioner. Maybe you think that all shampoos and conditioners provide the same results, but that is not true. All of us should be better researched on what makes a high quality shampoo or conditioner and even though it sounds a bit overwhelming, believe me, it's worth knowing about. In addition to knowing what to look out for in your washing products, there are also ways of improving your washing techniques. From cutting down on product use (which also helps you save money and is great for the environment), to knowing where and when to apply the product on your hair, you will find everything you need to know in this article. Now, let's speed up our hair washing routine while protecting our health and achieving shiny, gorgeous hair together!

How To Choose A High Quality Shampoo 

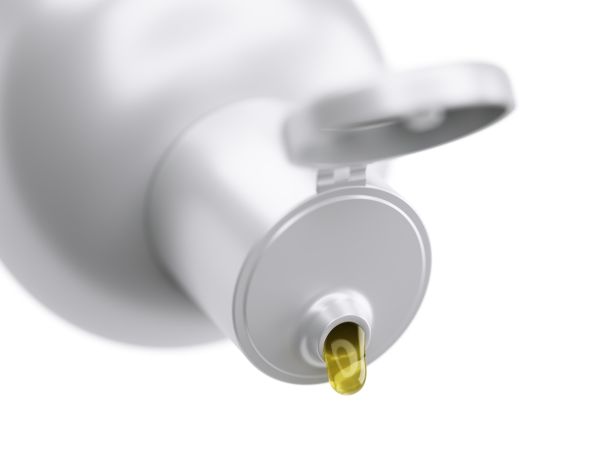
     To do this correctly, you should start by looking for products with natural ingredients and higher degree of viscosity. The viscosity of a liquid is the consistency. The thinner it is, the faster it flows out of the bottle. The slower it flows out of the bottle, the higher the viscosity. Lower viscosity products have a higher water content by volume; higher viscosity products tend to have more of the active ingredients you need for cleansing your hair successfully.

Open Shampoo Bottle- ISA Professional

Natural Ingredients? 3 To Avoid In Shampoos

     The word "natural" is broad and can be easily misunderstood when it comes to personal care products for your hair. Many companies use this kind of buzzword to give you a false sense of security. There seems to be an ever growing need for products with words like natural, organic and chemical free. Although it may sound difficult to know which products are actually natural, there are certain ingredients you should avoid altogether; below are the usual suspects that you should stay away from:

Sodium Lauryl Sulfate/Sodium Laureth Sulfate (SLS)

     Chief among these is Sodium Lauryl Sulfate/Sodium Laureth Sulfate (SLS), a surfectant that is used in many cleaning products, from shampoo to soap to dish soap. It is a skin irritant and may be contaminated with potentially toxic manufacturing impurities such as 1,4-dioxane.

Fragrance/Parfum

     The name of this one sounds innocent enough, fragrance sounds like it should just be something that smells nice. Beware, fragrance is a catch all term that can encompass a large range of chemicals. There can be a undisclosed mixture of scent chemicals and fragrance dispersing ingredients such as diethyl phthalate. These can cause lung and skin irritation, as well as potentially damage the reproductive system.

Triclosan

      This is an antibacterial and preservative which can persist in the environment and may be associated with endocrine (hormonal) toxicity.


     A trick to telling shampoo and hair wash quality is by the size of the nozzle. Most shampoo comes in a flip top bottle with a nozzle built in. The larger nozzles tend to come on products with less active ingredients. The larger nozzle makes you more likely to squeeze out more shampoo. I'm sure you've experienced this, and once it's already in your palm you feel like it would be unhygienic to return it to the bottle and a waste to throw it down the drain, so you put it in your hair and end up using too much shampoo. This is not only a waste of money but also of time because it will take you longer to wash the shampoo residue out of your hair. Additionally, because you used too much shampoo and over cleansed the scalp, you will then need to overuse conditioner in order to replenish the lost moisture, leading to more wasted money and over use of product.

Best Method for Washing

Woman Shampooing Her Hair- ISA Professional

      Once you have chosen a good shampoo or hair wash, the method to washing your hair is simple.


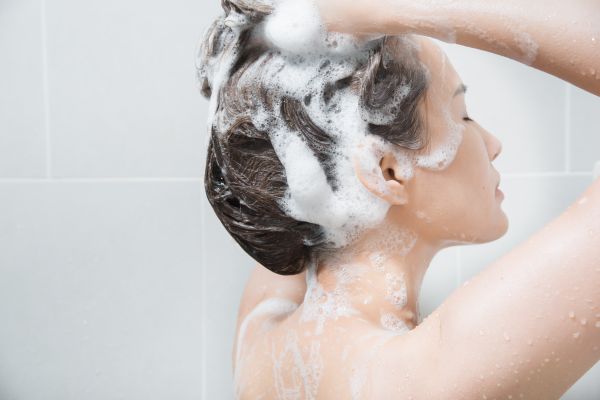
     First, thoroughly wet your hair with warm water. Second, dampen your hands. Third, squeeze the shampoo or hair wash onto the palm of one hand. A dime sized portion should be sufficient for short hair, a quarter sized portion for medium/shoulder length hair, two quarter sized portions for longer hair. Before you apply the shampoo or hair wash, first rub the palms of your hands together to create a lather from the shampoo and the water already on your hands. Then, apply to your hair starting at the top of your head. Then insert your fingers until the tips of your fingers touch your scalp and massage the shampoo or hair wash outwards toward your forehead. Then place your fingers back on top of your head with the tips touching your scalp and massage the shampoo back towards the nape of your neck and tips of your hair. This way, the shampoo or hair wash will stay in contact with each part of your hair for the optimal amount of time: longest on the parts of the head that produce the oils, and shortest on the tips of the hair which are the driest and most easily damaged.

     After you have washed your hair, and given yourself a relaxing head massage in the process, rinse your hair. As a general rule of thumb, you should rinse you hair for three to five times as long as it took you to wash it. You should count this time from when the shampoo or hair wash first touched your hair to when you began to rinse it. If it took you 2 minutes to wash, then it should take you 6 to 10 minutes to rinse it all out. Stand directly under the stream of water and occasionally sweep your hair with your hand, but do not brush when wet as brushing wet hair can damage it.

     Bonus points for doing a finishing cold rinse!

     If you can stand the temperature change, the best final rinse for freshly washed hair is to rinse it thoroughly in water that is as cold as your tap can give you. When I'm camping, the water comes from the well and it is really cold but I smile while trying to not grit my teeth and I tough it out because it leaves my hair so smooth and shiny! The reason this works is because the warm water of the shower opens up the cuticles on the surface of your hair, which under magnification look almost like fish scales. Tricks such as rinsing off in cold water, or flat ironing with a hair straightener in the direction that the cuticles face, smooth them out and seal the cuticles so that you get healthier, stronger hair, and brilliant shine.

     If you used a quality one step hair wash then congratulations and skip to the end on how to dry your hair! If you have a two step shampoo and conditioner combo, then it is now time to apply the conditioner. Conditioner is designed to replenish to hair some of the moisture lost while shampooing and cleansing it. Conditioner can also have ingredients that will smooth, soften and make hair more manageable.

Blonde Woman With Shiny, Healthy Hair- ISA Professional

3 Top Ingredients To Avoid In Conditioners

Polyethylene Glycol (PEG)

     PEG is a small organic alcohol that is commonly used as a conditioning agent. It's a skin irritant and can cause allergic contact dermatitis (rash) as well as contact urticaria (hives).

Dimethicone

     Dimethicone is a silicone based polymer which is used as a conditioning agent and lubricant. It makes the hair seem slicker when used in conditioner. It is classified as expected to be toxic or harmful and is an environmental toxin and can bio-accumulate in your body.

Phenoxyethanol

     Phenoxyethanol is a preservative and fragrance used in skin and hair products. It is highly irritant to skin, eyes, and lungs. Further, it can cause organ system toxicity.

The Truth About Conditioner

     The important thing to remember about conditioner is that most conditioner is designed predominantly for hair, so that's where you should put it. You do not need to apply it in the massaging technique to your scalp. If you have ever used argan oil on your hair you will know what I mean. Over the course of several hours, some of the oil is drawn up naturally up the hair shaft and into your roots. If you have a greasy scalp or hair that becomes naturally oily soon after washing, then apply conditioner only to the bottom 1/2 of your hair. For everyone else, applying conditioner to the bottom 3/4 of your hair is best and capillary action will take care of the rest.

     When applying conditioner, begin at the tips of your hair. Use the same amounts for conditioner as for shampoo given above. Rub the conditioner between your damp hands, then begin by rubbing the tips of your hair if you have short hair, or close your hands around the tips of your hair if you have long hair. Work your hands up toward the roots but do not apply conditioner directly on the roots.

     Because of the way that the moisturizers in conditioner work, you do not have to rinse for as long. A good rule of thumb is to rinse for the same amount of time as how long the conditioner was on. So if it took you two minutes to condition, then rinse for 2 minutes.

     Again, bonus for doing a finishing cold water rinse!

Drying Your Hair

Woman With Long, Straight, Healthy Hair- ISA Professional

     There is a myth that drying your hair naturally, without the use of a hair dryer is the best way to attain healthy hair. This is true, but with some caveats. If you live in a hot, dry, low humidity environment, with lots of sunshine and a steady breeze, and you can spend half an hour in said breeze after you wash your hair each time, gently brushing it, then yes drying your hair naturally is a great choice.

     However, if you live in the world that most of us live in, with time pressures and high humidity summer, then using a hair dryer is best. What you want is to dry your hair the fastest way possible, while using the lowest temperature that is not room temperature. On most hair dryers, this equals the low (but not cold) heat setting and the high speed setting.

     And voila! I hope you've enjoyed reading these tips on how to pick a high quality shampoo and conditioner, then using them to attain your best hair ever! Did you learn anything new? Do you have any tips or ideas to add? Tell us in the comments below.

Save
05 Aug '16

Niomi Smart & Zoella : Our UK Fashion Crush

Top British Style and Fashion

We're slightly obsessed with British fashion and we admit it. There is something about the approach to styling in the UK that really resonates at all levels. From simple, to complex, and down right daring; there is such a large and diverse pool of fashionistas and looks to draw from that inspiration is always just around the corner. Britain has been linked to high fashion and top fashion models for decades. Some of the biggest style icons of the 60's were and still are British and they shaped the way fashion evolves. Just look at Emma Watson! However, things are different now and fashion icons can come from anywhere. Some of the most influential fashion and even lifestyle icons of the day are product of their own ingenuity, perseverance and internet presence. By sharing their unique point of view, flawless fashion sense and infectious personalities on their blogs and across all social platforms, they have become some of the biggest names in the UK and our go to source for countless lifestyle, fashion and beauty tips and inspiration

Niomi Smart

Talk about treasure trove, Niomi's website has it all! She not only has a singular style and sharp eye for fashion, she also has the best workout tips, recipes and even life advice. Sure she has grown to become one of the top in the UK but she still has a genuine feel and such a sunny personality that you cant help but connect to her on an almost personal level.


A photo posted by Niomi Smart (@niomismart) on


This is a great example of her style, simple and relaxed but styled and accented to perfection. The print combined with denim works wonderfully and her whimsical makeup accent takes the style to a fun new level that really pops. And look at her hair, its gorgeous!

A photo posted by Niomi Smart (@niomismart) on


This look is such a pretty statement, it's elegant and fun, cut to perfection and flows beautifully. It is perfect for the setting which was Wimbeldon because it says all the right things and demands just the right amount of attention. Plus it's perfectly accessorized with those sunglasses, shoes and purse!


This video shows one of the main reasons we return to this her blog. Despite all the fame she still keeps it very real and connects with her audience. Niomi strives to really be a source of betterment for her readers. It may come in the form of makeup and hair tips, healthy recipes or just honest talk about real experiences, but you can tell it's always honest and personal.

Zoella

Who hasn't heard of Zoella at this point? But that doesn't mean she's done or overrated, quite the contrary she is going very strong. Zoella has such a great and unique and wonderful aesthetic for pretty much everything. Her posts, photos and videos are meticulously crafted to reflect her point of view and she does it wonderfully. Everything she shares has a real sense of fun and enjoyment, you can see how much she loves what she does in every post and frame and that is why she is one of our top picks.


A photo posted by Zoella (@zoella) on


This look is so clean and chic, it has all the right attitude to make her stand out and still has a breezy, relaxed summer feel.  The details of the dress combined with the hat looks perfect against the golden fields and blue sky, it's not just a well styled outfit but a great photo.


A photo posted by Zoella (@zoella) on


This is the ideal look for a fun summer day in the city, whether it's urban exploration or plans with close friends it works to perfection. This is head to toe proof that style does not need to be sacrificed for comfort. From the messy bun all the way down to the shoes, the attitude is perfect and the styling is impeccable.


Her YouTube channel is not only filled with great makeup and beauty tips but it also gives insight into her life. Videos like this, where she plays Pokemon GO with friends make watching her content such a fun and varied experience that ends up showing you things you never expected. Have an amazing time and a huge laugh watching!

Let us know what your favorite UK bloggers are in the comments below!


01 Aug '16

Braid the Day Away: Our Favorite Braided Hairstyles

Best Braid Hairstyles

Brunette with Beautiful Braids ISA Professional

Braiding can be an art-form all in it's own. Or it can be a quick way to give you and your hairstyle a bit of a change. From casual, low-key occasions to formal events, the right braid can take your style to the next level.

There are so many places to get ideas for braids, just browsing thorough Pinterest can be supremely overwhelming. While you can always check out our Pinterest profile for of the best hairstyle ideas and top outfits of 2016, we wanted to share a few of our personal favorite braided hairstyles with you here. In order to do braids well, it all comes down to practice and technique. A lot of people give up on braiding their own hair because it "ever comes out as nice" as when they braid other people's hair. While braiding a friend's hair is always simpler there isn't always someone around to help, that's why practicing the same braid over and over again is crucial. Once you understand the proper technique, mastering it via practice is the only way to get perfect results. Because of, that we're going to include videos by some of our favorite YouTubers who truly know what they are doing. So the next time you're looking for a new and comfortable hairstyle for the gym or something to make you stand out, you'll know just where to look.

Like most things, braids turn out better with a bit of planning. Starting with clean hear is obviously ideal, that way your braids wont looks weighed down by natural grease. Using day old hair is ideal, that means you have straightened your hair but have given it enough time to slightly return to it's natural shape. Combing your hair out before braiding is also a must, your hair should be completely tangle free so you can have ideal results. Braiding can also be a bit harsh to your hair since you are tying and twisting it after all. Try to braid when your hair is healthy and shiny and always give your hair a little extra TLC before and after using a braided hairstyle. A deep conditioning or an intense argan oil treatment can save your hair from breakage and other damage that could result from the braiding process.

Become Gorgeous

The Waterfall Braid is one of our favorites of all times. It is extremely versatile and gorgeous making it ideal for so many occasions. This video show us just how simple and surprisingly quick it can be.


Carly Bybel

The Dutch braid and French braid are the ones everyone should master. These will serve to develop your technique so you can move on to the more complicated styles. In this video, Carly explains the proper technique very clearly and efficiently with excellent camera work so that you can see exactly how to do it right.

We hope you liked the hairstyles and found the videos helpful. Let us know what you think in the comments below!

Save

SaveSaveSaveSaveSaveSave
26 Jul '16

History Of The Flat Iron

The History of Hair Straighteners

Hair straighteners are, for many of us, an essential part of our beauty routine. Some of us use them daily and some just for the weekend, but there’s nothing like the confidence boost you get when you’re done doing your hair. Your time and work paid off and you feel ready to conquer the world. Hair straighteners are also great when you want a change of look: if you have naturally straight hair, you can use the hair straightener to create waves or curls; if you have naturally curly hair, you can use the hair straightener to achieve a sleek, straight style. Hair straighteners have been tweaked over the years to ensure safety and efficiency, and I thought it might be nice to look back and see how this hair tool giant was created in the first place.

The First Hair Straighteners

 Old Antique Iron used for Hair - ISA Professional

We have Parisian Marcel Grateau to thank for inventing the first heated rods in 1872. It was actually a comb with metallic teeth, which then inspired Erica Feldman to use it on her hair to control it. It didn’t end there; in 1909, Isaac K. Shero found out that the best way to straighten hair was by using two clothing irons, pressing them down together on both sides, which then left the hair sleek.

A few years later, in 1912, the Scottish Lady Jennifer Bell Schofield took this idea to another level, and invented a hair tool that had two metal plates on either side, joined by a hinge at the bottom. This allowed the user to clamp and unclamp the metal plates on their hair, leaving behind perfectly straight hair. She had grown tired of the curly haired norm and wanted to be different. She was definitely a woman ahead of her time, which then inspired other women to follow suit and try it out themselves. Her invention is the model that most resembles the hair straighteners we know today.

Women in the 1950’s would use a clothes iron to straighten their hair by placing their hair on a flat surface and ironing it as they would for clothing. By the 1980’s, beauty companies decided to improve the safety and efficacy of previous designs by surrounding the two hot plates with insulating plastic. This reduced burns and made it easier to use. I think we can all agree that this was a huge step forward!

Advanced Hair Straighteners

 Woman with Long Straight Helathy Hair - ISA Professional

While the two plated hair straightener is the one that has stuck around, it doesn’t mean that the technology remains the same. It's been improved on further. Nowadays we have many different materials to choose from when deciding on a hair straightener; it’s now a matter of knowing which to choose and why.

As I’m sure many of you already know, not all hair straighteners are of the same caliber and when you want to protect your locks from damage, you have to go with a high quality material and brand. Stay away from any hair straightener whose plates are not made out of ceramic or titanium; these lower quality hair straighteners are basically just metal plates, making them very harmful to your hair. Ceramic and titanium hair straighteners are the best of the best (titanium being the top tier for stubborn or thick hair), especially when the plates are 100% of the material! While it may be pricier to get a 100% ceramic or titanium hair straightener, I think it is well worth the investment. These straighteners won’t break or damage your hair, and if taken care of properly will last you many years.

Mirror Titanium Hair Straightener Flat Iron- ISA Professional

Now let’s talk hair straighteners HG (or holy grail), mine being ISA Professional’s Mirror Titanium Digital Straightener. Not only is it a beautiful candy apple red, it’s also tapered around the plates, making it easy to create waves and curls with it. The plates are also made out of, you guessed it, mirror titanium, titanium that is so smooth that the plates look like black mirrors. It’s also digital, which is amazing because it allows me to choose the right heat setting for my hair type. This hair straightener has such an advanced design and is so easy to love because it doesn’t tug my hair, heats up super quickly and has cut my hair styling time by half!

I have color treated, frizzy hair which can be hard to control but this straightener was up for the challenge and then some. I almost couldn’t believe it myself but my smooth, shiny hair is the proof. I’ve also gotten many compliments on how shiny and healthy my hair looks, so this tool is definitely a winner and a permanent staple in my hair care collection.

Hair Straightening Brushes

 Brunette with Healthy Hair - ISA Professional

I also want to talk a little about the newest trend hitting the beauty world right now, hair straightening brushes. These brushes have a built in heat plate on the base of the bristles, making it the only tool you need to straighten your hair. Some women with thicker or coarser hair like using the brush and then quickly using their hair straightener after, to ensure maximum smoothness.

The tips of the bristles are cool to the touch and have no give, making it easy to use and you won’t have to worry about burning yourself. Gone are the days of using a blow dryer before getting that sleek look you want; these brushes will give your hair the control you need. As with any hair tool, always look for a quality brand and materials, as well as a digital temperature readout. Remember, you need to find the right temperature for your hair type, in order for the hair tool to work its best!

What's your hair straightening regimen like? Do you use hair straighteners, curling irons, hair straightening brushes? Tell us in the comments below.

SaveSaveSaveSaveSave

« Previous 1 27 28 29 30 31 39 Next »


Shopify secure badge
Copyright © 2024, ISA Professional.

Cart Summary
Continue Shopping
ISA Professional Heat resistant curling glove for hair curler flat iron hair straightener
ISA Professional Digital Titanium Flat Iron Hair Straightener
387.00
Cart Summary
Complete your purchase by clicking "Checkout" button
ISA Professional Heat resistant curling glove for hair curler flat iron hair straightener
12.99
ISA Professional Digital Titanium Flat Iron Hair Straightener
387.00
@